It is usual to keep building and running the tests in the workstation along the development. This is a main part of the TDD cycle as explained here and shown in this article. Discipline is required in order to never forget running the tests after making changes although every developer take a leap of faith that simple fix that will never go wrong. Those are the risky moments where we change a small thing, go directly to committing/pushing it the Git repository and realizing later that some test is broken.
This is one of the reasons to setup a test build service in the Git repository that will run the tests every commit that is pushed to it. After the tests are built there will be a marker in each commit showing if the tests passed or not and allowing opening the build/run log messages of that test execution.
Side comment:
I’ve added tests for the HAL_GPIO_mock after the last post. It was updated in this commit.
OK, now back the this article’s subject: setting up a test build service in the repository. This is a step of a development practice called Continuous Integration (CI) where changes in the source code are checked against its tests to assert a correct behavior. A complete run of this procedure usually converges to the Continuous Deployment (CD) stage that will put the new code version to run in a server when talking about web applications. It is possible to implement the Continuous Deployment in embedded systems when some firmware-over-the-air update system is implemented. This is usually not the case, but I may get there someday. The objective here is setting up a CI server that will run all the tests for every commit in the GitHub repository and show if everything is OK or blame the developer that pushed code without fixing the tests.
There are hundreds of providers for this service that are integrated to GitHub (check this marketplace list), GitLab or any other version control service. I’ve directly implemented only solutions with Semaphore CI for now. It offers a few plans to choose,going from Free to few hundred dollars a month (for growth companies that need more performance in the tests). The basic plan has always worked for me, even in professional situations. Tests for “simple” embedded systems as this one do not require many dependencies to install and steps to build so a few minute are enough to execute the full procedure and show a result.
Setting up Semaphore account is simple and their documentation is really good so I won’t get too deep in details around here. It’s basically creating an account in their website and connecting it to your GitHub account or organization.
The next step is creating a New Project for the repository you are working on. A screen called “Create workflow” will show up after selecting the repository. It contains multiple workflow examples for some most common use cases and many languages. You see that there is nothing dedicated to C neither C++ ![]() although there is nothing to worry about, just select “Single job” and we will setup it to work as we need. Click in “Customize this setup” to configure the workflow.
although there is nothing to worry about, just select “Single job” and we will setup it to work as we need. Click in “Customize this setup” to configure the workflow.
The build procedure is configured by a file in this path: .semaphore/semaphore.yml inside the repository. It is possible to create/edit this file manually in your code editor but the Semaphore website provides a visual interface to do that and this is how I use to do it. YAML files are almost a default nowadays to setup CI workflows in many services. This file will contain all information required to execute the tests, since the machine and operational system that will run it to step-by-step line commands to run. It is possible to setup multiple pipelines, blocks, steps, prologue, epilogue, dependencies, etc. This page shows some important concepts about the workflow names and execution order.
Click in the PIPELINE are to configure the Agent as a “Linux Based Virtual Machine”, the other setting don’t matter much but I’m using:
- OS Image: ubuntu1804
- Machine Type: e1-standard-2
- Execution time limit: 10 minutes
Now click in the “Block #1” to setup the execution steps. This is the place to insert the line commands to execute. There are a few sections here:
- Prologue: commands that will be executed before each Job
- Jobs: small tasks that will be executed in parallel
- Epilogue: commands that will be executed after each Job
There is probably a more organized way to set this process but I’m setting this project with only one pipeline with a single block and a single job. The Semaphore interface was updated in the last months and I’m not very familiar with this workflow and will post another article after learning new useful tricks for it. Let’s get in details about what I use in each section for this block.
Prologue
checkout
gcc --version
g++ --version
The first line is straightforward, just get the files from the git repository. The other ones are there for a debugging reason. Semaphore machines usually come with an old GCC suite and that is probably gonna result in build/run errors since my workstation runs a newer version. Freezing the build environment dependency versions is usually a good practice to avoid getting problems due to something that got updated and is resulting in problems, it is a detail enhancement for the version control. I’ve inserted these lines since every execution of the workflow keeps all the logs for latter reviewing. At this moment they report this result:
gcc (Ubuntu 4.8.5-4ubuntu8) 4.8.5
g++ (Ubuntu 4.8.5-4ubuntu8) 4.8.5
And my workstation is at:
gcc (GCC) 9.2.0
g++ (GCC) 9.2.0
The next step is dedicated to fix this inconsistency.
install-package --update gcc-8 g++-8 lcov
sudo rm /usr/bin/gcc
sudo rm /usr/bin/g++
sudo ln -s /usr/bin/gcc-8 /usr/bin/gcc
sudo ln -s /usr/bin/g++-8 /usr/bin/g++
gcc --version
g++ --version
It will install gcc-8 and g++-8, remove the original executables and create links for the new ones. The last two lines will make clear which version is used to build the tests. This is not a complete freezing of the build environment since the minor version is not specified but my project is not so critical to require this and the minor version will be shown in the CI build logs for further review. I’m forced to use version 8 instead of 9 since the newer one is not available in the Ubuntu 18.04 distribution as it is a LTS version. Maybe I should downgrade my workstation to this version but I’m not in the mood ![]() . I’m installing
. I’m installing lcov too since it will be used later to build code coverage reports.
The versions are these ones now:
gcc (Ubuntu 8.3.0-6ubuntu1~18.04.1) 8.3.0
g++ (Ubuntu 8.3.0-6ubuntu1~18.04.1) 8.3.0
Jobs
This step is not so complicated since our test suite is already working with simple make commands that are easily implemented as a script to execute inside the CI service. BUT there are a few requirements to do before this last step. I’ve explained them in this post. It will be inserted here in a really similar way, just adding a few debug commands that may help in detecting some errors later.
git submodule init test/cpputest
git submodule update test/cpputest
The checkout command executed in the start of Prologue section will not download repository submodules. At this moment Cpputest is the only that is present. Remember to update this section if other submodules are required.
PS: This procedure works only for public repositories. Cloning private ones is possible but will require setting up an access token in GitHub and the Semaphore project. More on that in a future post.
cd test/cpputest
ls
./autogen.sh
./configure
make -j4
This is where Cpputest is configured and built for this machine. The ls is a debugging command to check that the submodule got downloaded correctly and -j4 option will force building with 4 threads (a small performance improvement and build time reduction).
cd ../..
cd test
make clean
make check_paths
make flags
make debug
make -j4
This part is the final one, getting in the test folder, running some debug commands, building and executing the tests. It is important to keep the make -j4 as the last job line since any command that fails inside the block execution will result imply the workflow return FAILED as a result. Having all available debug commands executed before the make line will make sure that all available information about this build is already in the log.
Final steps
This visual interface will create a .semaphore/semaphore.yml file for your repository. Click in “Run the workflow” to save and test it. Saving mean that Semaphore will commit this files to your repository before executing it. A new branch will be created for that, you can check the changes executed, name the commit and this new branch (mine was automatically named as set-up-semaphore so I’ve kept it like this). Click “Start” to approve the commit and execute the workflow. It will take you to the Workflow execution monitor (just made up this name since I couldn’t find one in this screen). Click in the commit name inside the Pipeline block to get a live view of the build log.
It is now time to check if everything is working as expected and the job shows a PASSED result. I recommend setting this up in a stage that the tests are passing in your workstation since the job will (or at least should) result in FAILED if any test is not passing.
Remember to create a pull request from this branch to your development branch after everything is setup correctly. This set-up-semaphore branch will not be required anymore unless other changes are required in this workflow and you don’t want to mess with the development branch commit logs. Simple changes can be executed directly in you code editor since the semaphore.iml file is just another file inside the repository (just remember that it is inside a hidden folder for Linux and MacOS users).
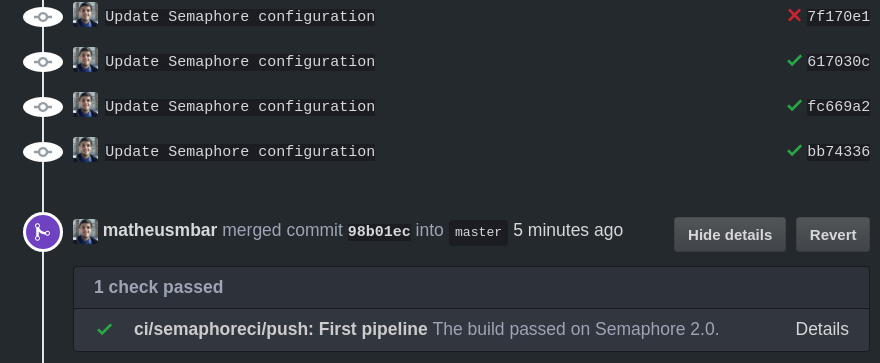
The best part is that GitHub finds the test results for each commit and will show them with no mercy so everyone knows easily if the tests are passing or not. It is really useful when checking a pull request status. Clicking in the ![]() ,
, ![]() or Details will take you for the build log inside Semaphore for each commit.
or Details will take you for the build log inside Semaphore for each commit.
This is all for today’s article. You can check my .semaphore/semaphore.yml file here and the project commit for this stage.
